
- (0)
- 17
Jul -
Author : Stocks_Reporter Category : ThinkOrSwim, ThinkOrSwim Set-up
ThinkOrSwim is one of the highest rated trading platforms available. The reason for this is that it is a stable platform that is highly customizable. When I first started using ThinkOrSwim I wasn’t a huge fan. It didn’t feel very intuitive to me. It was complicated and had a steep learning curve. But, once I became more familiar with all the features, I quickly realized how powerful this platform actual is. ThinkOrSwim has lots of very robust features that a lot of people might not even realize exist. The real potency of the platform is in the “filters and studies” which can be personalized and custom coded in infinite ways. I will write articles on setting up “filters and “studies” in the future, but this article will cover how to set up a basic workspace which will best compliment your trading style.
 The first thing you should do to customize the “look and feel” of your platform is go to “setup > Application settings,” from there you can go through each tab on the top and change anything that you wish to personalize. One of the main things that I changed in the setting was under “general> look and feel.” I set the color scheme to “dark.” I find it a lot easier to view black charts with green and red candle sticks, than lighter charts. Also if you are staring at your monitor for 6-8 hours a day, black charts can be easier on the eyes. Go through each tab and each setting and decide if you want to leave it at its defualt setting or if you wish to change it. I left most of these setting at “default.”
If you are a extremely active day trade, and are routinely managing many open trades, it may be worth it to customize the “hot key” section and enable the “active trader” hot keys. If you take the time to learn a few important hot keys, you can set keys to get you in and out of trades in seconds with the click of just one key. For example, “Flat position, Reverse position, Buy at market, Buy at Ask, Buy at bid, Sell at Market, Cancel All, Cancel Buy, Cancel Sell.” Obviously be very careful when setting these hot keys. Always set the hot key to be two keys held down simultaneously instead of just a single key stroke. For example a buy order should be “Alt B, or Shift B, or Control B” instead of just “B.” That way you are not going to inadvertently do something that you did not intent to do.
 Once your Application setting are all set the way you like them, you can then move on to setting up a platform layout. The way you layout what shows on your monitor will depend heavily on what type of a trader you are and how much monitor space you have available. If you are a long term trader, the way your platform is laid out will not be as important. But for short term traders, that are mainly day trading, based on stocks that are “in-play,” the way your platform is laid out is critically important. You need to have as much useful and pertinent information available to you, in the clearest possible way, so that you can make good trading decision as efficiently as possible.
The way to create you layout is by creating “windows” of information called “gadgets.” Click on the icon on the upper right hand corner of an existing gadget or window and then click “Detach gadget.” You can then choose the gadget type and resize it by dragging from the lower right-hand corner. You choose the gadget type by selecting “switch gadget.“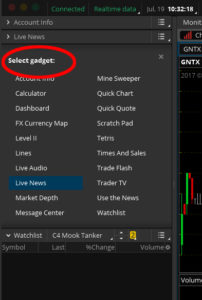 from there you can make that window display as a chart, a watch list, a level II quote, etc. Once you have all the gadgets you need, you can resize them and laid them out on your computer screen until you are satisfied that you have a clean, useful layout. It helps if you have two large monitors. When your layout is set up the way you like it, go to “setup>save workspace as…” and save the workspace with any name you choose. The name of the workspace you created will then appear on the bottom of the setup drop down menu. You can create multiple workspace layouts and easily switch back and forth between them. This is very useful if you are signing on to your ThinkOrSwim platform from different computers. You can have a simple, pared down layout for when you are on your small screen laptop, and a more extensive layout for your main, two large monitor computer. If you look at the drop menu of the first screen shot in this article, you will see that I have four different layouts saved.
You can also edit the look and feel of your charts. How your charts render on the screen is extremely importation in my opinion, especially for people who use chart patterns, support/resistance or any of the thousands of other chart indicators (VWAP, RSI, SMA, EMA, MACD, etc.) to make trading decisions. To edit your chart style, click on the preferences icon on the top right hand side of a chart then go to “Style>Settings.” You can also save chart styles by going to “Style>Save Style…” and naming the style. This is very useful, as it gives you the ability to use different chart styles for different charts. If you want to switch between chart styles you go to “Style>Load Style>Name of style.” I personally prefer clean charts with no indicators turned on by default. If I wish to view an indicator, I turn in it, view it and then usually turn it off again.
 To set the preferences for your charts click on the “Preferences icon>Style>Setting…” you can then go through all the tabs along the top and change any of the default setting that you wish to. I am a day trader, so I personally prefer viewing a 1-minute chart. I will look at longer time frames as well to see where the stock is at in the larger scheme of things. I will often look at a 10 day chart, 1-month chart, 3-month chart and 1-year chart, before switching back to the one minute chart. That way I can determine what the long term support/resistance is, and also how close it is trading to its 52 week lows/highs. There is a wide variety of preferences you can set for your charts. I won’t go through each one. You can go through each tab and see what each preference does to determine how you prefer your charts to be set up. The main things that I change on my charts is the color of the candles, background and grid. Also, on the time axis I set the expansion area to “30 bars to the right.” That way the price is not moving right up against the right edge of the chart, which I find very distracting. I like having that 30 minutes of open space to
  visualize where the price is going to go. One last note about charts. You can set up a chart gadget to have as many charts in a grid as you want. You set up the number of charts and grid configuration by clicking on the “cells icon (icon is a box divided into 4 cells)” and then dragging your mouse out to the amount of charts and cell configuration that you wish to have in the gadget.
Below are screen shots showing the layout of my two monitors. I also have another two monitors which are running other software and websites unrelated to ThinkOrSwim (tweet deck, Finviz, news sites, chat rooms, etc.).
- Filter watch lists
- Main Focus charts (I usually draw on these to set up trades)
- Secondary charts and indexes
- Quotes and Level II trade grids
- Activity and positions (working orders, filled orders, cancelled orders and open positions). This screen shot shows no positions for privacy. But, I have it set up to show the dollar & percentage profit loss on each open position, and the dollar amount of the entire open position, etc. This is the most important section of my screen, so it needs to be set up so that I can clearly see where I’m at with all open trades.


